As some of you might have seen last week on Facebook, I was busy building a wire trellis for the latest addition to my garden. A wine grape! While I realize that it is fairly late in the year to be planting a grapevine, (usually this should be done in the spring to give the plant time to develop a strong root system) and probably won't get much in the way of grapes this year, I was super excited when I was gifted this wine grape from my Uncle Bruce! I am not entirely sure exactly what kind of grape it is, but for the purposes of building a trellis it really doesn't matter.

Do Grapes Require A Trellis?
Traditionally in Europe, grapes vines were coppiced instead of trellised. This essentially means the vine was grown without a trellis for the grapes to grow up, and instead the entire plant was pruned back to the main stem every few years, allowing new shoots to grow from the base of the plant.
The end result looks like a small bush growing 3 or 4 feet above the ground. Since grapevines only bear fruit on first-year shoots, coppicing ensured that every year new shoots would grow from the main stem and produce an ample harvest. Because the root system was already fully developed, these new shoots would grow remarkably quickly.
The advantage to having a grape vine growing up a trellis is that, while you still need to prune the vine back to the major stems, you can expose the plant to more sunlight and airflow, resulting in a healthier and more balanced plant.
Trellising grapes was initially introduced to help reduce disease among the plants as trellising provides better airflow and sun exposure. This method of growing grapes is also more controlled allowing for the production of more fruit.
Building Your Own Wire Trellis
So how do you build a trellis and what kind of trellis should you build? Well that entirely depends on what you want to do in your garden! I am planning on using the trellis as a privacy screen on the edge of the property line, as well as providing a place for my grapes to grow and provide lots of fruit for me!
I am a firm believer in growing your own produce, since outside of requiring a little initial work, it's well, free! You could build a trellis using a piece of lattice, you can construct an arbour style gate, you can even use a fence line to help train your grape. Seeing as I don't have a current fence on the property line, I decided to go with a more traditional wire trellis.
Materials Needed
For this DIY wire trellis project I used:
- Two 4x4x8 fence posts - which I cut a 22-degree angle at one end
- A single 2x4x10 - for the top "plate"
- About 50ft of galvanized steel wire (the stuff used to put up chain link fencing)
- 4 turnbuckles
- 4 J-hooks
- and 4 eye screws
- 3 bags crushed pothole gravel

I also bought a few bags of crushed gravel which went into the post holes. This helps water drain away from the wooden posts which helps reduce rotting. The gravel has the added benefit of creating a more compact base for the posts to stand in.
Instructions
1. I started by digging two 2ft deep post holes for my fence posts 10ft apart. Since I did not have access to any heavy machinery, I dug these by hand. Let me forewarn you, it took about an hour to dig just two holes! I made the holes about 12 inches in diameter, giving me enough room to get a spade down into it, yet at the same time keeping it small enough to ensure a snug and secure base for the posts. Since I wanted a 6ft high trellis I dug the post holes to a depth of about 2.25 feet. The extra depth will be explained shortly!

After digging the post holes for the wire trellis, I went in search of some flat rocks (of which there are fortunately plenty) in my yard. These rocks sit on top of about an inch of crushed gravel and will serve as the base for which post will stand on in the hole. It allows for drainage as well as a solid foundation, for the inevitable freeze-thaw cycle that happens every year.

2. I placed the fence posts in the holes and filled the holes three-quarters of the way with crushed gravel. I made sure to use a leftover piece of 2x4 to stamp down the gravel and create a really nice compact base. I could tell the post was already starting to feel quite secure and had minimal movement.
This is the time when you want to use a level and ensure your fence posts are straight! After you fill in the rest of the hole with excess dirt and compact that down as well, your fence post is essentially set in place and you will not be able to straighten it out without having to dig up the entire shebang.
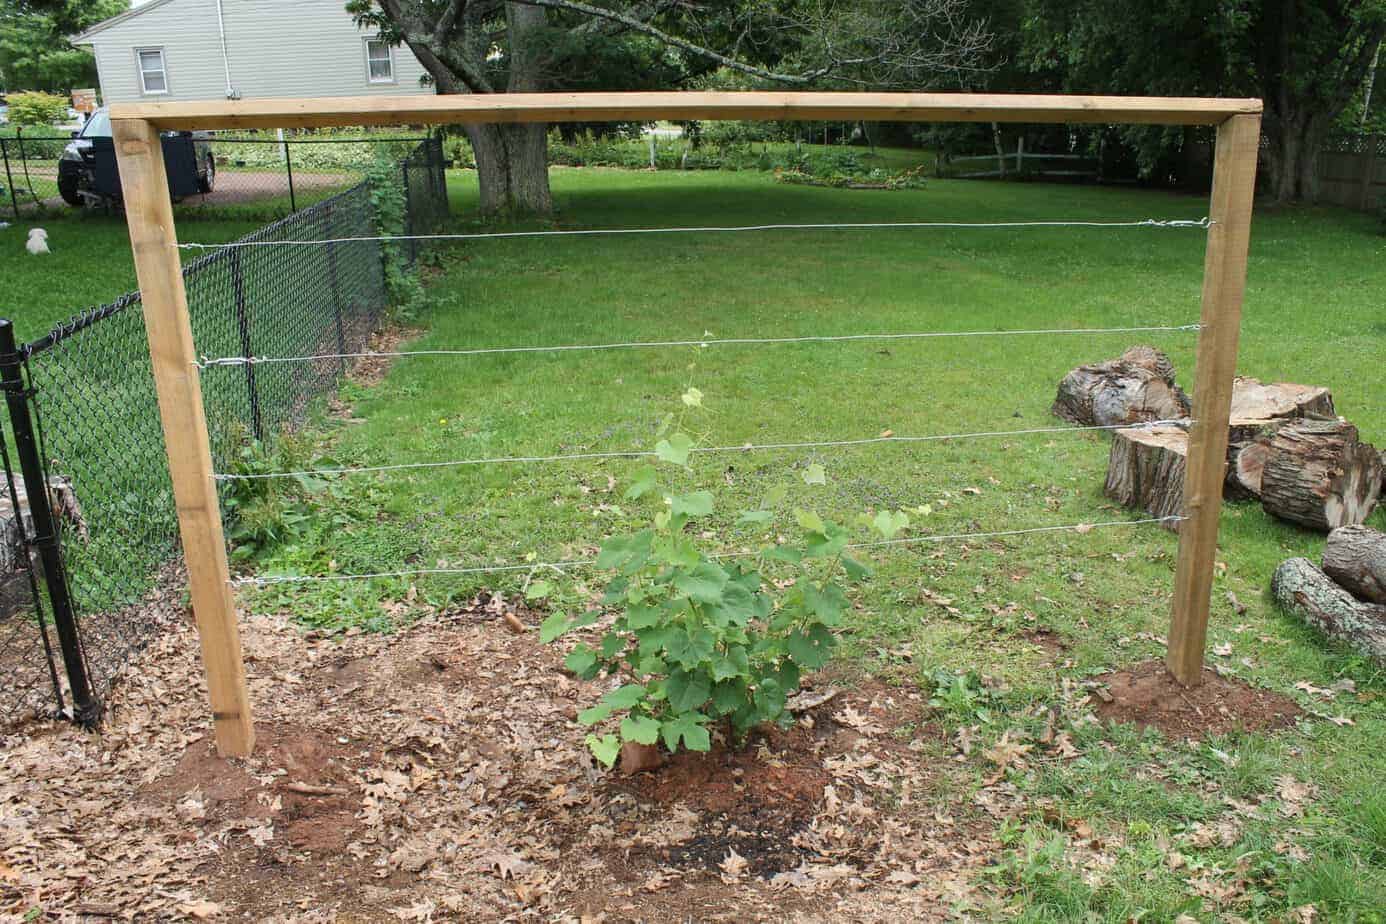
3. Once the posts were securely planted in the ground and level, I screwed the 2x4x10 to the top of the posts. The entire frame almost instantly became rock solid and there was hardly any wiggle left at all. As I had mentioned previously, I installed the top bar at a 22-degree angle. This allows water to run off the top bar of the trellis and reduces the chance that the wood will rot.
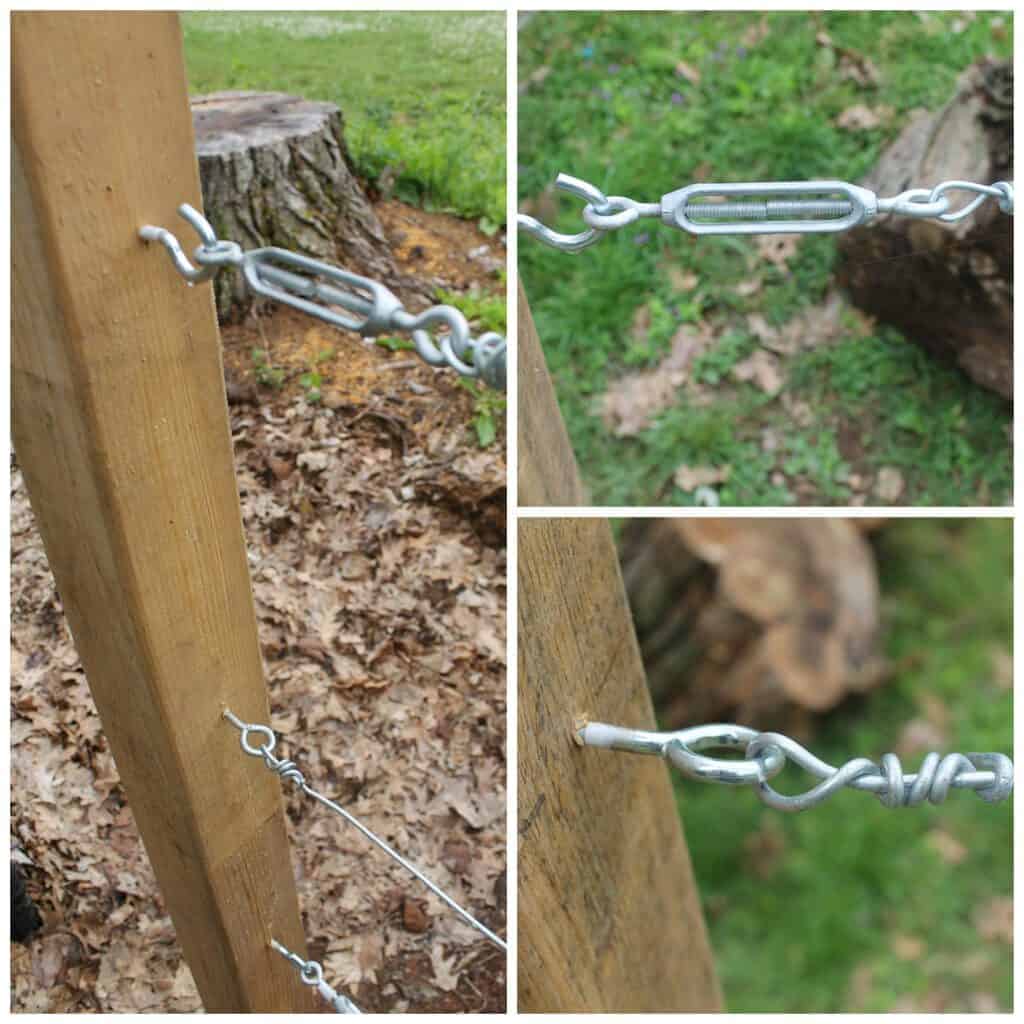
4. The next step involves drilling pilot holes 1 foot apart all the way up the end posts, on the inside of the frame. Into these pre-drilled holes, I screwed the J Hook on one end and the Eye Screw on the other. This gives me a solid anchor to which I can attach my steel wire on one side.
The J-hook allows me to attach the adjustable turnbuckles on the other side of the frame. This allows me to tighten the wire as needed if the ground shifts or the vine becomes too heavy and the wire begins to sag. I alternated on which side I installed the turnbuckle, to evenly distribute the force the wires would exert on the posts in the frame.

After installing the wire and tightening them with the turnbuckles, all that was left was to dig a hole for my grapevine and transplant it! This was arguably the easiest part!

You can find more DIY gardening tips and tricks in the Gardening section of the blog. I will periodically be posting about my adventures in growing my own produce to use in various recipes (such as growing garlic to use in this Basil & Garlic Scape Pesto) and how to plan for your first vegetable garden.
Did you find this guide useful?? Comment & Rate it below, then tag me on Facebook & Instagram: @earthfoodandfire . For more DIY gardening tips & from scratch recipes follow me on Instagram & Pinterest

Building A Wire Trellis
Tools Needed
- Measuring Tape
- Shovel or Spade
- A Level
- Screwdriver
- Drill
- Wire Cutters
- Miter Saw
Materials Needed
- 2 each 4"x 4"x 8' fence posts which I cut a 22-degree angle at one end
- 1 each 2"x 4"x 10' wood peice for the top "plate"
- 50 ft galvanized steel wire the stuff used to put up chain link fencing
- 4 each turnbuckles
- 4 each J-hooks
- 4 each eye screws
- 3 bags crushed pothole gravel
Instructions
- Start by digging two 2ft deep post holes for the fence posts 10ft apart. Make the holes about 12 inches in diameter, giving you enough room to get a spade down into, yet at the same time keeping it small enough to ensure a snug and secure base for the posts.
- After digging the post holes for the wire trellis, place about an inch of crushed gravel in the bottom of the hole with a flat rock on top. This acts as the base for the posts, and allows for drainage.
- Place the fence posts in the holes and fill the holes three-quarters of the way with crushed gravel. Stamp down the gravel with your boot or piece of 2x4.
- Use a level and ensure your fence posts are straight! Once straight fill in the rest of the hole with excess dirt and compact that down as well, your fence post is essentially set in place and you will not be able to straighten it out much, without having to dig up the entire shebang.
- Once the post sare securely planted in the ground and level, screw the 2x4x10 bar to the top of the posts.
- Once the top bar has been secured, drill 4 pilot holes 1 foot apart all the way up the end posts, on the inside of the frame. Screw a J Hook into every second hole on one side and the Eye Screws in every second hole opposite a J-hook.
- Install the wire stretching it from eye hook to on one end to a turnbuckle on the other. Attach the turnbuckle to a j-hook and tighten the wire.


Joe
I did this yesterday and it came out great. Rather than using 4x4s, I felled a white oak tree of similar dimension and peeled the bark off and used them as the posts. It looks beautiful. It might rot more quickly but it looks good and it was free!
Chef Markus Mueller
Awesome! I love the natural wood look aswell!
Chad
Hey there, what gauge wire did you use? I bought 16 but I see other setups calling for 9 gauge.
Chad
Nevermind, I see below you said 9 gauge.
Liz
If I wanted to make one longer than 10 feet, would I need a third post in the middle? I was hoping to make one about 15-20 feet in length.
Chef Markus Mueller
Hi Liz, yes I would add more posts if you plan on building a longer wire trellis. How many posts will depend on a few things such as how deeply the posts are buried, what kind of plants will be growing up it(ie the weight), how much wind it needs to withstand etc. For a 20ft long row I would probably put a post every 6 to 8 feet, similar to the spacing you would see in a wooden fence.
James F Niemir
Great project. Any follow-up photos of the grape plant and trained vines?
Chef Markus Mueller
Hi James, unfortunately I don't as we moved to a new location the following year and I have not yet acquired new grape vines!
Joe C
I made this exactly as described this morning. Came out perfect! I used 12g wire. I may add another post to make it 20ft in the spring
Chef Markus Mueller
Awesome! Glad to hear it. What will you be growing up your trellis?
John Kuehnle
Nice looking trellis!
I built a similar one prior to seeing yours. Since I don't trust 4/4's not to warp (I've had bad experiences with this in treated wood), I constructed the uprights of 2 - 2x3x8's clued and screwed to form a T. To make the wood last longer, I coated the uprights with linseed oil before placing them in the ground.
As well, I spaced my uprights 12' apart, with no top piece, whereas yours are 10.' I wonder if there's an idea spacing between uprights?
Chef Markus Mueller
Hi John, I like your design! Linseed oil is a great idea to help the wood last longer. I have used it in my raised garden beds as well. The spacing of the uprights was just what I happened to have space for which is why I went with it! What if anything, did you do to prevent the uprights from pulling together when tightening the wire stretched between the two?
Jacquelyn
I noticed that the first wire closest to the ground is a bit longer than the 1 ft space you drilled the pilot holes. How many inches did you place the first one off the ground?
Chef Markus Mueller
Hi Jacquelyn, the first wire is more than one foot off the ground because the grapevine I planted was already a little larger and didn't need support that far down. The lowest wire is probably 2-3 feet off the ground, the rest are all 1 foot apart.
GLenn Hemperly
Great article, I’m going to build one this week, thanks for all the help I needed.
Chef Markus Mueller
You are very welcome!
IM
I did this the other day. Thank you so much for the help!
Chef Markus Mueller
You're welcome!
JayJay
Hello...
I love your post. Will this work if I'm attempting to grow passion fruit?
Chef Markus Mueller
Hi Jayjay, I have never tried to grow passion fruit, but I can't see why it wouldn't.
K
I made this today. It came out awesome. Was easy and fun to build.
Rocio
I'm following your directions and am very excited about my new grape trellis! I appreciate your details and the "ingredients" list - this is my first project of this kind. I wanted to suggest adding the wood screws in the list? I was able to borrow some from a friend but hadn't purchased any when I went to the store with your list in hand!
Chef Markus Mueller
Hi Rocio, I will add the screws to the list!
Tina allen
Hi! Would you be able to provide the sizes of the turnbuckles, etc and wire gauge that you used?
Chef Markus Mueller
Hi Tina, I don't have a gauge measuring tool, but I would guess the wire is either 9 or 11 gauge. I went to the hardware store and bought a spool of the wire used to put up chainlink fencing. As for the turnbuckles, they are about 2-3 inches in length when fully tightened and when fully extended are about 4 inches. Hope this helps!
Kerby Stephan
Question: why 4 lines vs the traditional 2 I see? Thanks so much
Chef Markus Mueller
Hi Kerby, no real reason...I didn't know 2 lines was traditional. Is there a reason for that? I made four because it added extra height to the trellis making it act as a bit of a privacy screen in my yard as well.
Chris Phillips
Why did you screw the hooks in inline with the direction of tension? Should've put it on the side of the post, so tension would not be able to pull the bolt out of the wood.
Chef Markus Mueller
Hey Chris, I don't really think that that would be a problem as the top cross beam will prevent the tension screws from pulling the posts together. I doubt you would get so much tension that you would pull a 2 inch screw clean out of the post. My trellis is still standing 3 years later with a now mature grape vine, and have had no issues, I've had to re tighten the tension screws but that's mostly because of movement from freeze/thaw cycles in the early spring. The eye hook screws haven't budged at all.
Athena
Could something similar be used for raspberry plants?
Chef Markus Mueller
Hi Athena, It could yes. You would just want to build it quite a bit smaller. Something like 5 feet high, because raspberry canes do not grow as tall.